How to blur background in Photoshop. There are several methods to blur a photo. However, the Iris Blur effect is a good place to begin.
Novices may find Photoshop overwhelming. Editing techniques that appear simple when shown by a Photoshop professional can require a software newbie hours to understand it according to their own. There are several factors why someone might wish to learn how to blur the backdrop of a picture in Photoshop.
For example, a hazy background on a product photo helps the goods stand out. Additionally, images with distorted backdrops, especially pictures captured with a narrow depth of field, appear more sophisticated since the appearance could only be produced with expensive lenses and an experienced photographer.
It may be simple to achieve the right distortion for your commercial shot backdrops using your camera. However, if you are unable to reshoot, you may achieve the same effect in Photoshop. We’ll demonstrate how to blur background in Photoshop so that your focus point can take center stage.
Things about Bokeh: everything you need before getting started
To edit background in Photoshop, there are a few distinct solutions available. Every tool offers a unique degree of customization and complexity. After experimenting with everything from specific choices to a full-fledged depth map, we discovered that the field blur function produced the greatest, most accurate outcomes in the shortest period.
Bokeh is difficult to replicate in Photoshop, even though several aspects influence true lens distortion. Such as the lens’s focal length, the structure and dimensions of an aperture, and the range from the specific matter. The importance of establishing the distance effect right is possibly the most essential of all.
To achieve a distortion that matches the actual item and alters with the proximity in Photoshop, you must instruct the computer which things are nearest and distant from the camera. Things that are more distant from the matter could perhaps show more distortion than nearer items. You might invest a few hours building a comprehensive depth map. However, the field blur function allows you to get a close approximation with far less effort.
It’s worth noting that Photoshop approaches are nearly often more time-consuming than achieving the same look in-camera. However, the field blur feature may easily mimic the Bokeh of an even more costly lens. Observe how a distortion in a genuine picture seems while you’re working. A lens sharpens every object that is within a two-dimensional area in space.
The amount of distortion rises while you move far from the field of focus that seems to be, facing the camera or distancing from it. However, any elements in a similar field as your topic should stay in focus.
How to Blur The Background in Photoshop
You’ll gain knowledge using the Photoshop Blur Gallery’s Iris Blur effect to distort a particular portion of a picture and produce a focus point by following the instructions.
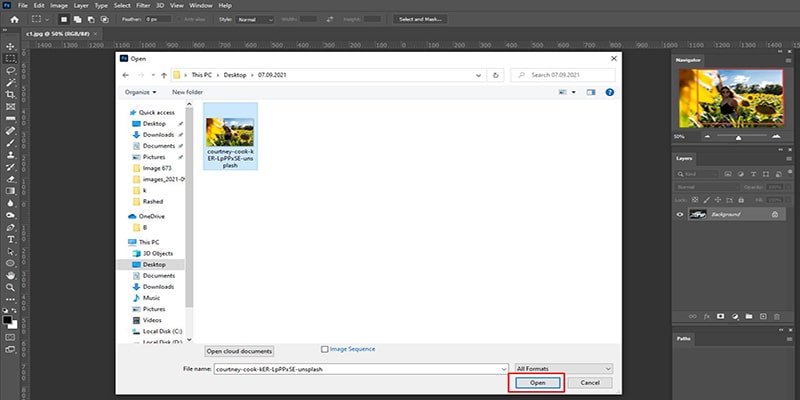
Step 1: Open a picture
Proceed to “File,” then select “Open” in Photoshop. Then select an image from the computer, alternatively proceed to “selective-focus-blur.jpg” when you’re trying to follow together with the demo. Hit the Open button.
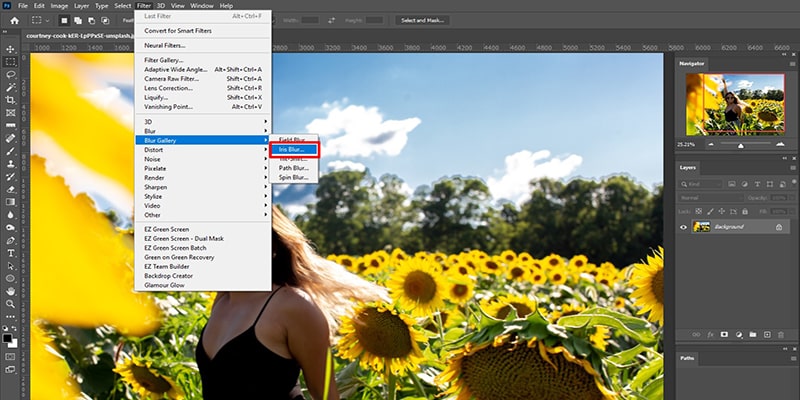
Step 2: Activate the Blur Gallery
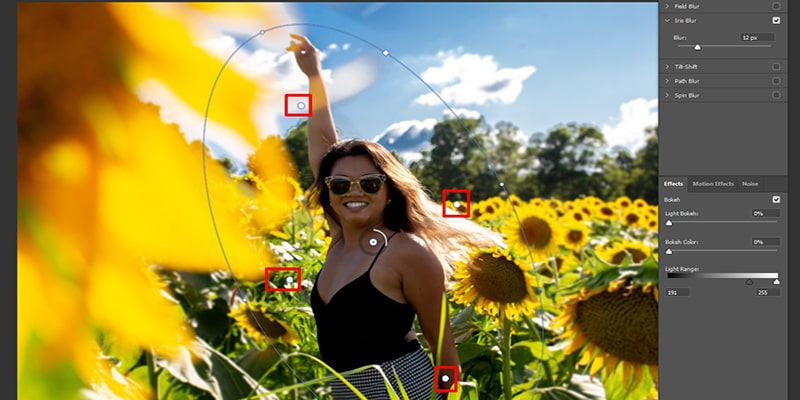
- Choose Iris Blur among the Blur Gallery choices available under Filter > Blur Gallery.
- Iris Blur can use to highlight a focal point in a picture despite blurring the remaining of it.
Step 3: Establish a focal point
- You’ll notice a big blur sample circle and many dots throughout the picture once Iris Blur first launches.
- A “pin” is located in the center of the circle. The pin is similar to a mark: the picture is precise and vivid inside this center; as you go far from the objective, the picture becomes increasingly blurry.
- Move the pin towards the figure by clicking and dragging the middle point of the pin. After placing the pin, let go of your cursor.
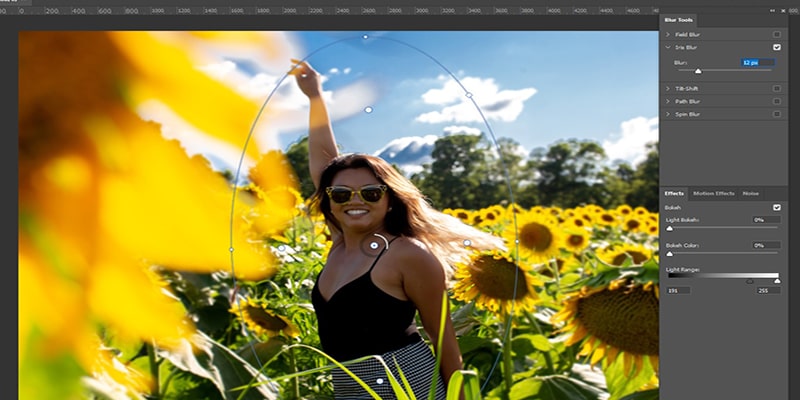
Step 4: Make changes to the blur area
- The blur preview’s outer circle denotes the point wherein the blur effect achieves 100%. The blur effect has indeed been introduced to everything beyond the circle.
- Four little dots appear somewhere within the blur preview’s the outside ring. Move the mouse around any of the little spots until you see a curving, double-ended arrowhead appears. To make the demo image, lengthen the blur display ellipse by clicking and dragging it. Then flip it somewhat counterclockwise.
- Tap and move the line instead of any spots upon the blur preview circle to enlarge the blue zone while restricting the form.
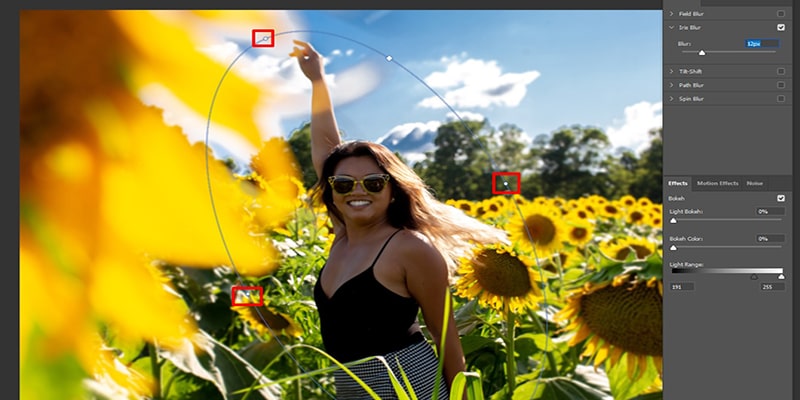
Step 5: Make adjustments to the blur transition
- The four bigger white spots that constitute the blur transition region are visible within the blur preview circle. The blur effect ranges from 0 to 100 percent blur among these bigger white spots and the blur preview or outer circle.
- To change the dimensions of the blurring transition region, press and move the white spots. To create the blur transition sleek, drag those spots nearer towards the focal point. To create the blur transition acutely, drag the spots further from the focal point.
- To create the blur transition slicker, place the huge white spots nearer to the subject in the demo shot.
Step 6: Increase or decrease the degree of blur
- The level of blur used can be controlled by adjusting the blur dial. That is located surrounding the pin throughout the middle of the blur preview region.
- To enhance the blur, press and move the blur dial in a circle. To decrease the blur, press and move the blur axis counterclockwise. Implement an 8-point blur to the demo image.
- The Blur slider inside the Blur Options column on the right side of your workstation can also be used to adjust the blur.
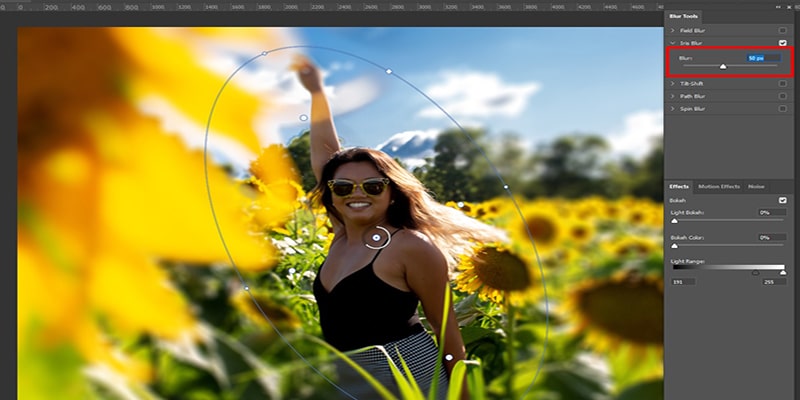
Hit Enter or select OK at the upper edge of the Blur Gallery screen once you’re done. Using the Iris Blur technique to create the content of your shot, stand out and offer the picture a distinctive style is a creative method. Use this technique to define a face in some portrait or draw attention to a particular part of a landscape.
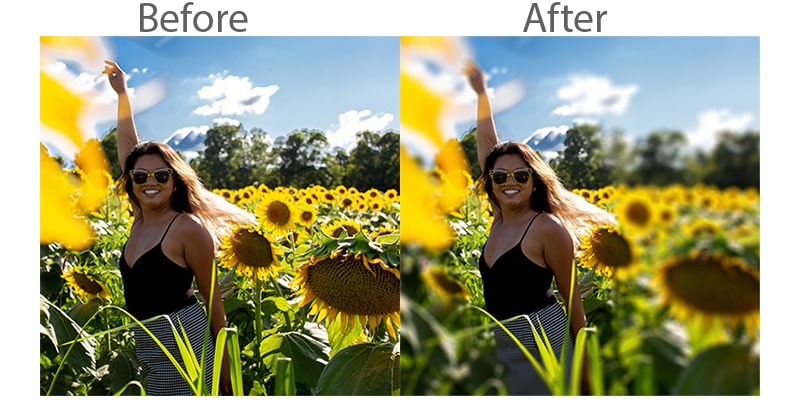
Before: A woman surrounded by a rainbow of powder, after that, Colors all around that woman appear crisp but distorted beyond the target region.
FAQs on Blur Background in Photoshop
How do I use the blur effect to enhance the beauty of my landscape photo?
What is the purpose of the blurring effect?
Conclusion on Blur Background in Photoshop
Blur effects open up a new range of possibilities. A blur effect may provide designers with motivation and aid in the translation of their concepts into reality. Though for a watermark effect, distort a photo and turn everything into a translucent background.
This might be utilized in a variety of settings to showcase your business while also safeguarding your copyright. To get more views and likes, publish this on social networking sites. After knowing how to blur the background in Photoshop, apply these quick methods. You wouldn’t have to be concerned when you wouldn’t get this impact throughout the shot.