Often a picture would be just preferable without the background. However, it can be for both commercial photography and website designing. Intending to complete the work without the proper equipment, on the other hand, can sometimes upset the finest skilled photographers.
Fortunately, the latest Adobe Photoshop improvements have simplified the procedure to edit background. Often all it needs is just a few mouse clicks. Turning the background translucent in Adobe Photoshop is a simple process that visual artists refer to as “pushing away the backdrop.”
However, this could be prolonged and difficult based on the particular topic you’re seeking to separate. It all boils down to how often the surrounding landscape and backdrop detail overlaps. We are therefore ready to discuss the methods of how to make background transparent in Photoshop CC 2020.
Make Background Transparent in Photoshop
Using Photoshop to create a transparent backdrop for your business model photo brings up a world of spectacular presentation alternatives for your highlighted products.
A transparent background, for instance, allows you to position your goods versus a constantly changing color background. In addition, highlighted merchandise with a clear backdrop on an appropriately built site might respond differently, including its background according to the recipient’s screen resolution.
After you understand what you are accomplishing by creating a translucent backdrop in Photoshop and exporting the file throughout, a suitable web-ready version is surprisingly simple. In the instruction following, we’ll guide you over this basic step of how to make background transparent in Photoshop quickly and simply.
Step 1: Create a Layered File With Your Picture
The Select Subject function is used to enable a new backdrop cleanup feature in Photoshop 2021. This quick-fix won’t always make it correct, but somehow it performs well enough for simpler photos and therefore can be readily improved for everyone else. Check to ensure that you install Adobe Photoshop CC 2020, edition 21.0.0, or a newer version before you begin.
If you don’t have the specific version available, you’ll have to upgrade the software beforehand. To construct such a layer, Photoshop requires applying the feature and replicating the backdrop layer. Later then you can copy and paste the full image by using “command + A” on Mac OS or “Ctrl + A” on Windows software.
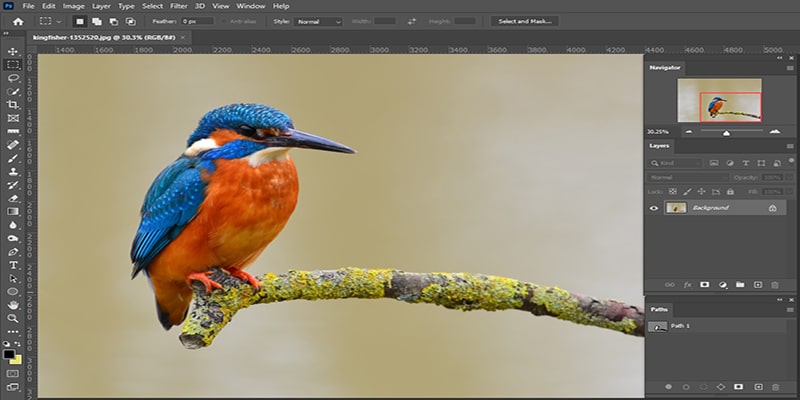
To conceal the backdrop, press the eye symbol beside the background layer inside the layers window. From now on out, you’ll only be dealing with the newest layer you just made.
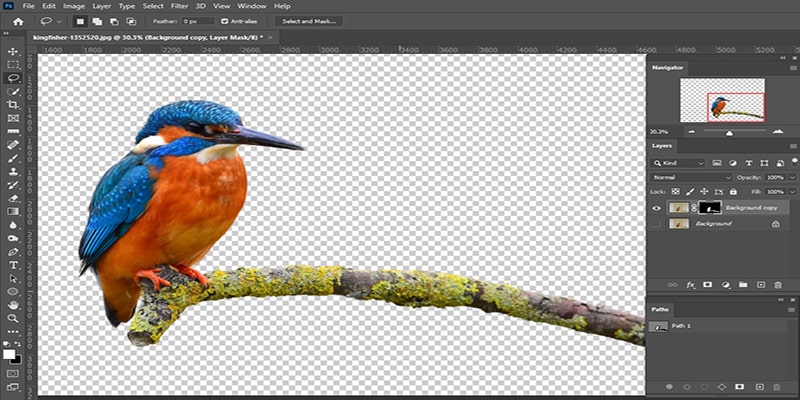
Click to the Quick Actions section inside the Properties menu to your right. If the Properties Menu is not visible, select the symbol that appears such as this below

“Remove Background” may be available in the Quick Actions menu. It takes a few moments for the computer to locate the topic and erase the backdrop. When the application is completed, the content should appear on a translucent backdrop. The checkerboard pattern serves as a marker.
Try to ensure that the background layer remains disabled when you do not notice the translucent background.
Step 2: Draw Your Conclusions
For several photographs, this simple process works perfectly. But for others, the outcomes are hilarious. If that doesn’t help, try the manual procedure mentioned below.
First, select upon this mask which Photoshop generated automatically if somehow the outcome is similar but not nearly precise. Then, in each layer’s panel, it indicates the monochrome photograph.
Always employ a white paintbrush that can contribute to the topic while the mask is chosen. Then use a black paintbrush to remove any areas of the backdrop that have not been eliminated.
Step 3: Save The Photograph
Designing a transparent backdrop in Photoshop is only the initial step. You must also save your photo of the object in an appropriate format in terms of its ability to appear on your e-commerce platform as a transparent background.
The clear background must now be around the topic with a checkerboard pattern. When satisfied with the outcome, erase the backdrop layer and save the picture as a PNG to keep the transparency. Rather you can save it as a PSD to return and conduct additional changes in the future.
Create a Transparent Background Manually in Photoshop
Picking a Selection Tool in Photoshop
Deciding whatever you intend to preserve and eliminating things you don’t like is the first step in creating a translucent background. But the one that is the most appropriate for the job of Photoshop’s various selection tools will only be determined by the photograph.
The choosing procedure is a little easier if you deal with a picture on a backdrop with plenty of contrast—for example, a darker color item on a bright background or perhaps a single-color trademark. We’re presuming you’re going to work with a much more challenging background for such a guide.
Even though you can erase a crowded backdrop, you could somehow erase any background. While you plan to move with a white or strong hue backdrop, get familiar with Photoshop’s various classification methods. This can end up saving you time.
Magic Wand Tool:

The magic wand feature can choose all pixels in the identical color family. In contrast, if you got a trademark on the white backdrop, everything you need to conduct is tapped on the selected white region to pick it, and after that, delete it to remove it. If there are numerous parts of the backdrop separated by segments of the item you’re planning to cut off, you might have to repeat the cycle.
Select Object:

To choose the perimeter of an item, the Select-Object function employs artificial intelligence. You create a basic shape to identify the element you want to use, while Photoshop A.I. does most of the work. This feature also can be utilized to erase an item from a selected area.
Rectangular and elliptical marquee:

Whenever you wish to choose an element that is a precise rectangle or circle, use the rectangular and elliptical marquee functions. Pick whatever you wish to preserve, and then proceed to another step.
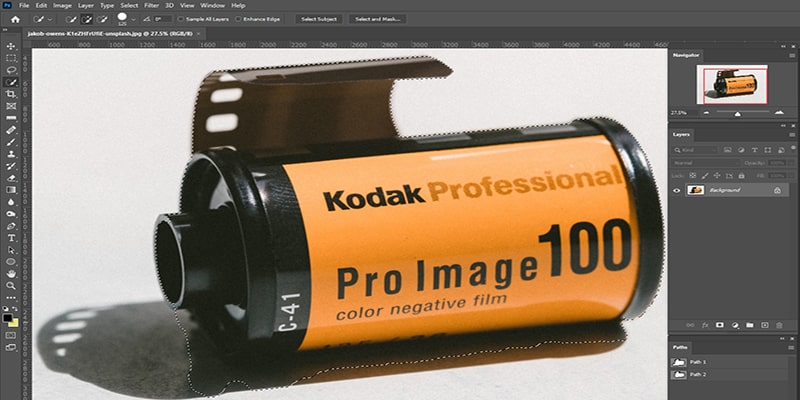
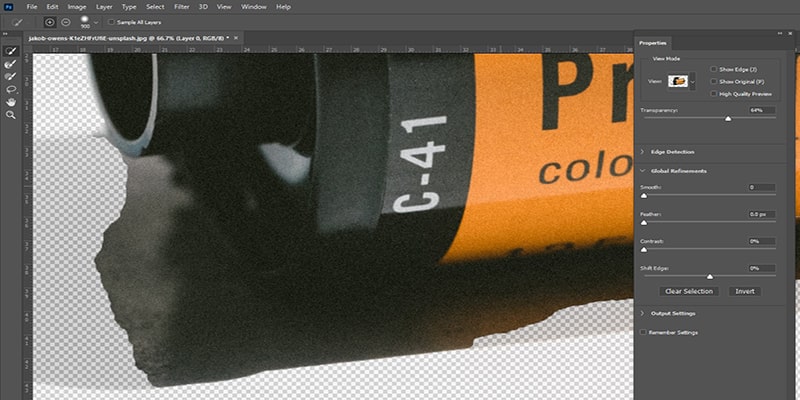
Select and Mask:

The lasso, Select Subject, and Select and Mask tools are now considerably more successfully eliminating a rather complicated backdrop. They are where most of Photoshop’s secret strength is found. The fundamental steps for placing these tools into action are outlined here.
How to Create a Transparent Background Manually in Photoshop
Step 1: Select Subject from the drop-down menu
The Select Subject tool in Photoshop makes background reduction simple. Select the subject given the drop-down option. The procedure requires a few moments; however, Photoshop will use artificial intelligence to choose the photo’s content afterward. The tool isn’t always ideal, but it’s good because you can fine-tune the selection during the following stage.
You can also utilize the Select-Object feature unless the image seems to have multiple topics and you would like to pick one product. Choose the Select-Object feature from Photoshop 21.0.0 or a later version from the toolbox. It’s hidden alongside the Magic Wand tool. Photoshop will choose the image for you if you sketch a box around it.
Need not panic if the element isn’t completely selected. You can adjust the selection during the upcoming step. If somehow the Select Subject tool doesn’t function for you or if you’re running an outdated edition of Photoshop, move onto another step and start over. If somehow the Select Subject feature functions flawlessly that it often does skip to stage four.
Step 2: Employ Select and Mask to fine-tune your pick for more difficult issues.
There is a decent possibility that your choice might not be perfect. If you’re operating with a well-defined-edged object, the magnetic lasso feature is generally the simplest option, so go over the following step.
The Select and Mask tool, on the other hand, frequently gives the greatest results for elements with less specified borders, roughness, and drastically uneven shapes.
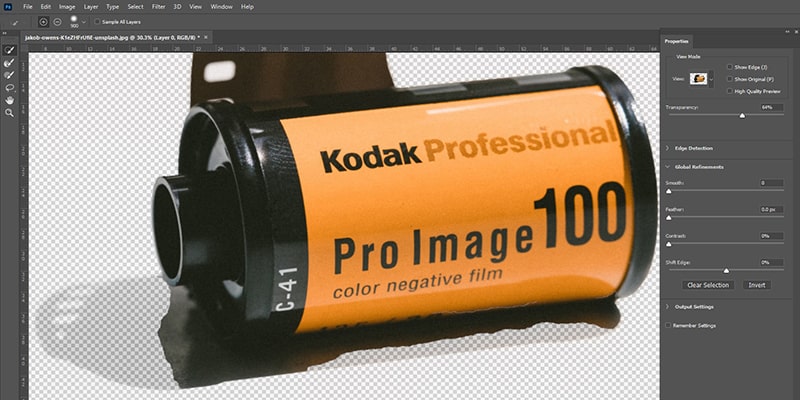
Go to Select > Select and Mask to fine-tune the choice. First, modify the choice in the Select and Mask panel. Then, click the plus symbol in the upper menu using the brush tool out of the left toolbar and sweep over everything that must be added in the choice, but it’s not.
Alternatively, use the minus symbol in the upper to sweep over any items that might not be added to the selection. Note that the purpose is to choose the subject while leaving the unwanted backdrop that is not selected.
Zoom in and employ a thinner brush size you can find immediately beside the plus and minus arrows at the highest point. Reduce the radius throughout the properties menu bar unless the brush is grabbing quite so much. Employ a larger brush size and expand the radius unless the brush itself is not picking sufficiently.
Utilizing the Select and Mask feature makes the best possible selection. However, do not worry unless it is not flawless yet. Whether you lean toward picking too much, this will be more difficult to return later once you leave something out. After you’ve narrowed down your options as much as feasible, click OK.
Before proceeding to the following step, zoom in on most of the corners to ensure you haven’t missed any of the choices. Assuming that is the case, reopen the Select and Mask feature and choose that region again.
Step 3: Make a layer out of your selection.
Save whatever you have chosen till now on a fresh layer regardless if it’s hardly perfect enough. Try to ensure you haven’t overlooked anything important. Copy (Control or Command + C) and paste (Control or Command + V) the selection while the “marching ants” is still representing it.
The pasted choice will appear like its individual layer by default. You can go to layer> New > Layer Via Copy if you like. Select the eye symbol beside the original backdrop layer there in the layers panel. You’ll be able to notice your transparent backdrop now; however, don’t erase it quite yet.
Step 4: Use the lasso tools and the eraser to fine-tune the work
Since Select and Mask performs well enough with complicated items such as hair, the magnetic lasso feature is sometimes quicker for clear outlines. If you’re cutting off an element with clear-cut boundaries, skip this step. Instead, continue improving your selection following Select and Mask.
The magnetic lasso feature should be selected. The lasso tools appear to be the third down from the upper end in the default toolbar. However, there are so many to decide from. Tap and hold, next select the magnetic lasso feature from the top bar.
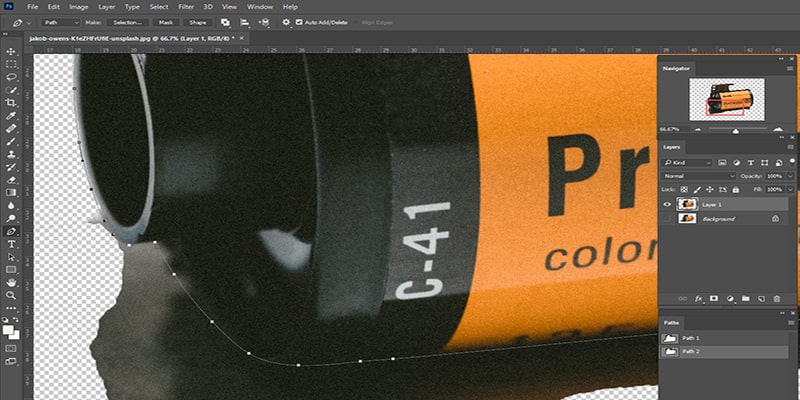
It’s the symbol with a magnet on the edge. The polygonal lasso tool might represent the simpler option if your item has both well enough and clean boundaries, but it does not function with curves. So instead, select whatever additional background regions you would like to remove by clicking around the element’s exterior wall.
The magnetic lasso will adhere to the element’s ends. However, you’ll need to click quite often to keep it on the main route. Instead, press the erase key after you’ve decided on a component of the backdrop.
Another option is to utilize the eraser inside the toolbar to delete areas of the backdrop after you’ve finished using the lasso tool. This is a wonderful method to make the last clean-up after you’ve finished using the lasso tool.
Step 5: Remove the background image
Lastly, go to the Layers board and choose the background layer. You’ll notice the choice you made at the beginning once you erase this layer. You can also create a new backdrop layer and play around with different color combinations, textures, photos, and patterns to see how your choice may look.
Step 6: Save the photograph in a web-friendly format
PNG-24 is the finest format for saving your picture. Since this format supports many levels of transparency, your picture will rarely produce a pixelated “halo” once inserted on a separate backdrop color.
When applicable, utilize a PNG-24 instead of an outdated translucent file format like PNG-8 or GIF, which might cause an unwanted halo effect.
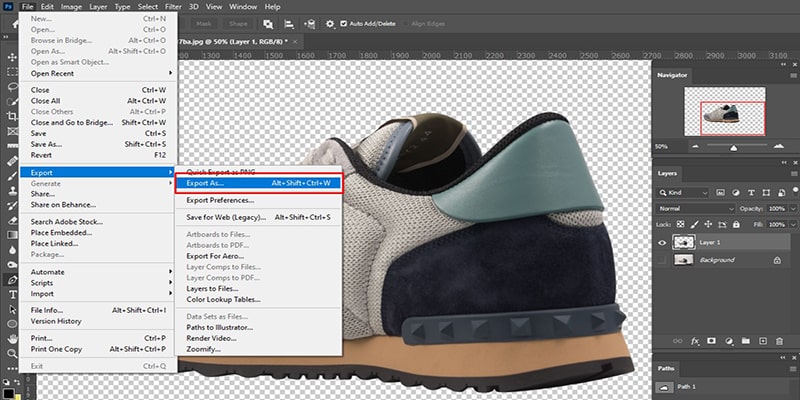
Using Photoshop CC, press “shift+alt+clrt+W” for Microsoft Windows and “shift+option+command+W” on Mac. You may also select “File > Export > Export As…” from the pop-up toolbar on the top of that same program panel to save the document as a PNG-24.
Adjust the Structure to PNG through the discussion window that displays, and try to ensure that the “Transparency box” gets ticked within “File Settings” on the right corner of the screen. Relatively small Files such as 8-bit should not be checked. This will change the file into a PNG-8.
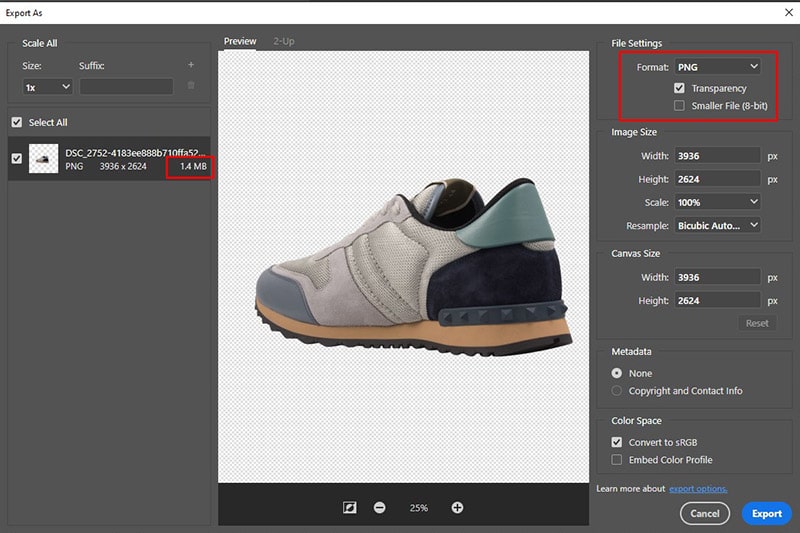
The file size of the PNG file is anticipated mostly on the left corner of the photo. This is essential to bear in mind considering bigger file sizes speed decrease the loading of your website.
You can change the proportions of your picture through Image Size on the right corner of your command window. Reduced dimensions characterize a lesser size of the file.
Yet, you should not reduce the size of your image to fit the specifications of your website. Conducting this will result in fuzzy or distorted photographs. Instead, you can decide to save just your highlighted goods photos enlarged for retinal devices. In comparison, the rest of your merchandise photos can be stored at their original size to decrease load time.
Step 7: Save your work
Press Export All after you’ve adjusted your Photo Format to the right specifications. Select the location in which you put your web-ready photographs in the Save pop-up window.
To minimize misunderstandings while loading your photos on the website, maintain your customized image files detached from the main image files. Give a title for the picture file and ensure the extension is.png. Lastly, save the file.
FAQs on How to Make an Image Background Transparent in Photoshop
How can I get rid of the white backdrop in a picture?
Is the backdrop of a JPG image transparent?
This configuration, like JPG, supports all these lossless like PNG and harmful compression. Given both, the form provides for transparency. Make a PNG file out of your picture. Press CTRL + T at the same time.
Last words on Make Background Transparent in Photoshop
Usually, product shots are better than internet photos because they don’t have a background. Using Photoshop excitement, therefore, it is feasible to apply a translucent background for the shot. This entire procedure, unfortunately, necessitates time, dedication, and expertise.
Using Photoshop to make transparent background of your product picture gives up a world of possibilities for an amazing display. That would be the only way to present all your goods pleasingly.
A translucent background allows you to display a product alongside a changing-color background. However, if you know how to make background transparent in Photoshop, your life would be easier.
You may read: